
The Secrets of Slideshow Effects: Motion Effects
How to Apply Pan, Zoom and Rotation Effects
A music slideshow with nice transition effects looks awesome. Apparently, such slideshows are a much more imposing way to demonstrate your photo collection to friends and family. However, static pictures alternating each other one by one are not the most solemn sight, after all. Surely, transition effects do contribute to overall impression of the slideshow, but wouldn’t it be better if photos too had their own dynamics and life? Vivid, picturesque images always perform better.
So, how do you make a conventional slideshow shine? A pinch of spectacular motion effects will drastically change the way your photo slideshow looks and feels!
Let’s define motion effects first. These are panoramic motion, zooming in/out and rotation. Unlike transition slideshow effects that define how one photo should transform to another one, each of these effects changes the way a photo should behave while it’s on the screen. Panoramic motion or pan makes the photo move along the given path, zooming zooms the picture in or out, and the rotation effect turns it clockwise or counterclockwise to some extent.
A modern video slideshow maker such as SmartSHOW allows applying the above effects effortlessly, even if a user doesn’t have any video montage skills at all. Let’s see how to apply pan & zoom and rotation effects when you're making a slideshow with the SmartSHOW app.
Applying Slideshow Effects in SmartSHOW
In order to apply one of the available effects to a particular slide, open the slide editor first. You can do this by double-clicking the slide or by using the right-click menu. The Effects tab in the slide editor window shows motion effects and artistic color effects offered by the program.

Choose one or several effects you’d like to apply to this frame and set the checkmark next to them. Note that effects have specific settings that allow you to fine-tune them to your current goal. By default, all values are set to minimum, but with handy sliders you can adjust the amount of pan&zoom or the angle of rotation. Depending on the scene and the overall pace of the slideshow, you may want to select different values of these parameters. For example, romantic scenes imply slow motion, while energetic pictures will benefit from faster movement and bigger motion amplitude.
Now, we'll review the settings for each effect.
Configuring Motion Effects
Pan X – values from 0 to 100%. This effect makes the imaginary camera eye move from right to left and display the parts of the image initially hidden behind the screen edges. Negative values reverse the direction of the motion, making the virtual camera eye move from left to right along the picture.
Pan Y – values from 0 to 100%. Works the same as above, but for the vertical axis. Same way, positive values mean the “camera” moves upwards; negative values mean the “camera” moves downwards.

Note that for the best quality and impression of the pan effect, the displayed part of the image should be lesser than the entire image at least for the amount of pan value, otherwise you will see the background of the slide. You can adjust the size of the slide on the Properties tab.
Zoom – values from 0 to 100%. This option scales the slide up or down just like zooming by the virtual lens. Positive values are for zooming in; negative values – for zooming out. Same as with pan, the zoom effect requires the smaller image (which is either the start or the end slide, depending on the zoom direction) to fit the screen. If that image is smaller than the screen area, the slide background will become visible when the effect is applied. Therefore you may need to stretch the image before using zoom out.
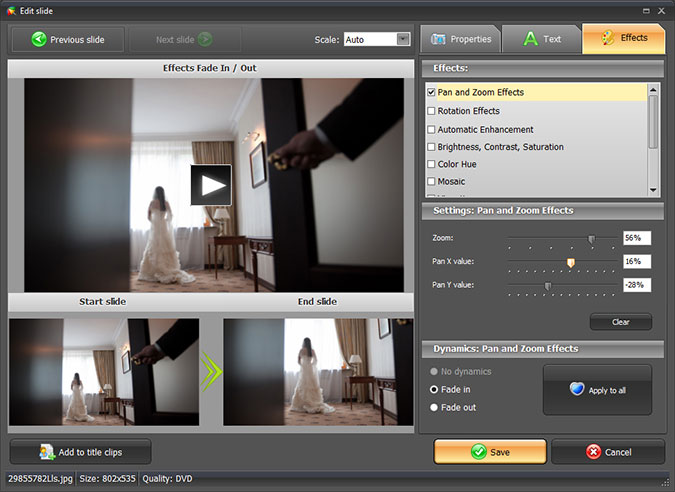
Pan and zoom effects are an excellent option if you need to focus the attention of the viewer on a given person or object on the slide; they are best to be applied together. For instance, let’s say you want to attract attention to a certain face on the photo. Double-click the corresponding slide, and zoom the start slide for a desired value. The more focus you want, the higher the zoom value should be, but avoid overzooming. Next, pan the photo so that the face would fit the displayed area. Use the preview to see if the final result looks satisfying, and if it does – click the Save button to save this motion effect for this particular slide. Click Apply to All to set the same effect for all slides in your project.
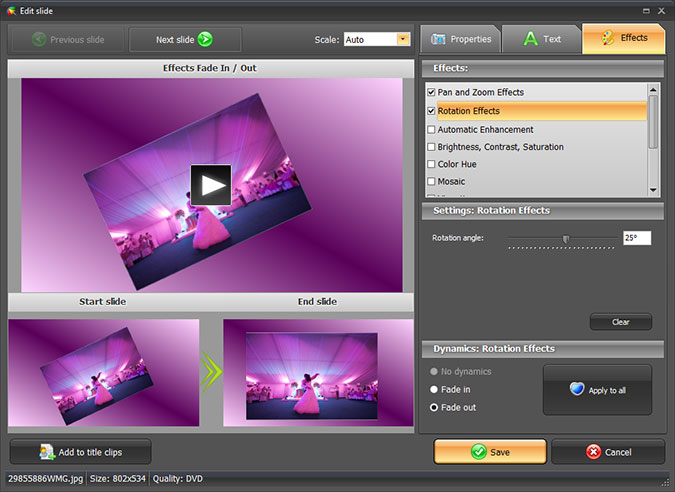
Rotation effect is very spectacular. Specify the angle you want to rotate the image, from 0º to 360º clockwise or counterclockwise. This special effect is quite a tricky one and works best for dynamic events, like sports, parties, adventures, tourism etc. You should carefully adjust the size and the position of the slide to make the rotation effect look cool. Experiment a bit with the option to find the optimal values.
No matter which effect you choose, the duration of a slide is a crucial matter. For smoothness, the duration shouldn’t be less than 5 seconds unless you’re using tiny amounts of panning or zooming. And again, think of the theme and spirit of the slideshow. Some require faster effects, others look better with slower pace. You can adjust individual slide timings in the slide editor, and the default duration of all slides in Project Settings. The Project Settings button is located in the top right corner of the program window.
As you see, applying spectacular slideshow effects in SmartSHOW is a matter of minutes and is absolutely clear, even for novices. Get the trial version now and start experimenting!
Try SmartSHOW!
Want to make stunning photo movies with your own pictures? That's as simple as ABC with Smart Slideshow Maker, and you can try it right now!
COMPATIBLE WITH
Windows 11, 10, 8, 7
OUR CUSTOMERS SAY: